Lookup Table Window
Lookup Tables and Lookup Files (residing on the disk) provide tabular information that can be used in the solution of the equations.
A Lookup Table is created using the New Lookup Table command in the Tables menu. The number of rows and columns in the table are specified when the table is created. These specifications may be later altered with Insert/Delete Lookup Rows and Insert/Delete Lookup Cols commands in the Tables menu. A Lookup Table can also be created by reading an existing Lookup File on disk with the Open Lookup Table command or the $OpenLook directive. See Lookup File Formats for more information.
Each Lookup Table that is created or read from a file appears in the Lookup Table window and is accessed by a tab at the top of the window. The functions that use the tabular data in the Lookup table refer to the data by the (case-insensitive) name on the tab. Clicking the left mouse button on the tab displays the information for that Lookup table. The name can be changed by right-clicking the mouse on the tab. There is an upper limit of 9000 rows and 1500 columns for the Annual and Commercial EES licenses for any Lookup Table. The Professional license has the same maximum limit on the number of columns, but the maximum number of rows is unlimited. There is no limit on the number of Lookup Tables that can be displayed in the Lookup Window, other than available memory.
Values in a column of the Lookup Table can be entered, cleared, or changed by either clicking the left mouse button on the triangular icon ![]() at the upper right of the header cell or clicking the right mouse button in the column header cell. In this case, a pop-up menu will appear having Alter Values as one of the menu choices. Selecting Alter Values will bring up the Change Table Column Values dialog, which provides a very easy way to enter or clear values in the column. This dialog also allows entry of equations that can be used to enter values into the Lookup table, providing a capability similar to that in a spread sheet program. A Sort menu option is also available by clicking the right mouse button in the column header cell. Data can be pasted into the Lookup table using the Paste command. The names and units of the columns in the table can be pasted using the Paste Special command.
at the upper right of the header cell or clicking the right mouse button in the column header cell. In this case, a pop-up menu will appear having Alter Values as one of the menu choices. Selecting Alter Values will bring up the Change Table Column Values dialog, which provides a very easy way to enter or clear values in the column. This dialog also allows entry of equations that can be used to enter values into the Lookup table, providing a capability similar to that in a spread sheet program. A Sort menu option is also available by clicking the right mouse button in the column header cell. Data can be pasted into the Lookup table using the Paste command. The names and units of the columns in the table can be pasted using the Paste Special command.
A column in a Lookup Table can hold either numerical or string information. If the column is to contain string information, the format style must be set to STRING. This format specification is made in the Format Table Column dialog that appears when the mouse is clicked in the column header cell. String data in the Lookup table are accessed with the LOOKUP$ and LOOKUP$ROW functions.
The INTERPOLATE command provides convenient interpolation or extrapolation of the data in any Lookup Table. In addition, the LOOKUP, LOOKUPCOL, and LOOKUPROW functions allow data in any Lookup Table to be linearly interpolated (forward and backward) and used in the solution of the equation in the Equations Window. The column titles, units, alternate units, and the format of the values in each column many be changed by clicking the right mouse button on the column title and selecting Properties from the popup menu. This action will display the Format Table Column dialog. . When used within a function or procedure, the LOOKUP function can also be used to set values in a specified Lookup Table.
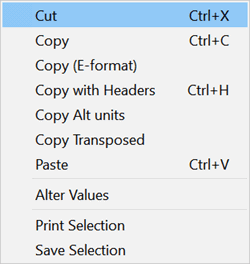
A range of cells in the table can be copied to the clipboard, after which they can be pasted into a different part of the table, into the Parametric Table, or into another application such as a word processor or a spreadsheet. One or more rows in the table can be selected by clicking the left mouse button in the row header column (the leftmost column). If the mouse is dragged to other rows while the left mouse button remains down, these rows will be added to the selection. A similar procedure can be use used to select one or more columns. An alternative way to copy a range of cells is as follows: Select the cell at the upper-left of the range by clicking the mouse button when the cursor is positioned in the cell. Now, hold the Shift key down and click in the cell at the lower-right of the range, using the scroll bars to bring it into view if necessary. At this point, you can either select Copy from the Edit menu or press the right mouse button to bring up a pop-up menu containing the Copy command. Either way will allow the selected cells to be placed on the on the clipboard. Use the Select All command if you wish to select the entire table. If you wish to include the column name and units along with the numerical information in each column, select the Copy with Headers menu item. Copy and Copy with Headers will copy the table data exactly as it appears. If you wish to copy the data with more significant figures, right-click on the table and select the Copy (E-format) menu item from the popup menu (as shown below). This menu command will copy the data in E-format with 14 significant figures. The Copy Alt Units command will copy the values in the alternate unit assuming they exist; otherwise, it will just act as the Copy command. The Copy Transposed command will copy the data and exchange rows and columns.
Lookup Tables are saved with other EES problem information when the EES file is saved and do not need to be saved separately unless the data in the tables are needed in other EES programs or other applications. A Lookup Table can be saved as a Lookup file on the disk using the Save Table command. Lookup files (in disk files) can be directly accessed with all of the commands used for Look tables, such as the Differentiate, INTERPOLATE, INTERPOLATE1, INTERPOLATE2, LOOKUP, LOOKUPCOL, and LOOKUPROW functions by providing the file name, instead of the Lookup Table name, as the first argument. The file name should be enclosed within single quote marks or defined with a string variable. The Lookup file may be binary (.LKT), ASCII (.TXT, .CSV, .DAT, and others) or EXCEL (.xlsx, .xls) files. The .LKT format requires less space and stores/retrieves information faster. This is the recommended method for storing lookup table if they are only to be read by EES. See Lookup file formats for additional information on Lookup files.
Right-clicking the tab at the top of the Lookup table will bring up the following dialog.
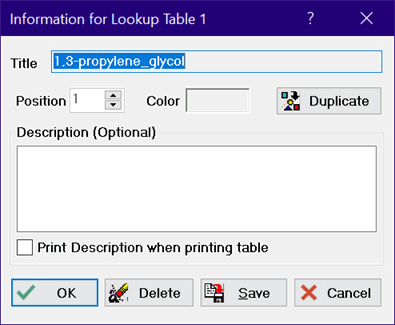
This dialog provides capability to duplicate, delete, or save the selected Lookup table. The position of the table with in the tabbed list can be changed in this dialog or more simply by dragging the tab left or right. Note that the Lookup table can be saved as a text file with or without column names. However, the Lookup table saved in either of these .txt formats can not be directly read by the EES Open Lookup Table menu command. The Lookup table saved by clicking the Save button in the above dialog is intended to be exported to another application. Use the Save Lookup Table menu command to save Lookup Table data in a format the EES can read.
The dialog also provides a place to enter a description of a table for reference. The description can be printed when the table is printed.
The size of the window can be changed by dragging the bottom-right corner to the desired height and width. If the new width and/or height of the window is greater than needed to contain the table, it will be automatically adjusted to fit. Hold the Ctrl key down to override this behavior.
The column position can be changed by either right-clicking in the header cell or more simply by dragging a column header (i.e., the cell at the top of a column) to another location.
If the number of rows or columns is not specifically known, this information can be determined using the NLOOKUPROWS or NLOOKUPCOLUMNS functions.
In the Professional license, all tables are equipped with a control to automatically resize the column widths. The control appears as a left-right arrow icon in the upper left cell of the table. Clicking the icon causes all of the columns to be adjusted to a width that is just large enough to display all of the information the column. Clicking the icon again returns the column widths to their original values. If the Ctrl key is depressed when the icon is clicked, the column widths will be set to their default values.
The Professional license provides the option to automatically update the values in a column that have been set with an equation. The equation can refer to the values in in other columns of the Lookup table or to any variables defined in the EES program.
See also: Change Table Column Values